
Sunday, 20 December 2015
Saturday, 19 December 2015
The Siding...


Beside the house we have added a slim shed, so we need another "S" bend for clearance.
This one is a 2m length with 1m curve each way. So about half the displacement of the 3m bend around the water tank.
Monday, 30 November 2015
Sunday, 29 November 2015
Friday, 27 November 2015
Main oval circuit is in one piece!
 The main 33m oval is in one piece. All welded joins except the removable points which have welded plates at the bottom of the rail, double bolted together. No expansion joints as 2/3 of the track can move on the road bed - enough, I hope. I calculate about 1cm movement from 0 to 40C...
Still have some levelling and ballasting to do but...
And still have the Y to do, but have everything lined up and the track is nearly levelled - which affects the levels on the Y of course.

Wednesday, 25 November 2015
Back to track work
 Now that the turf under the track has been dug out, and the track moved back, I have been levelling, welding joins, installing the sleepers, packing the granitic sand roadbed, and using it to ballast too.
 I am 2/3 of the way done - for the main 33m ( about 8x7m) oval. And it is starting to look like a railway.
With one big shove I can get the small bogie all the way around the 20 odd metres!!!
Tuesday, 24 November 2015

Saturday, 21 November 2015
Sod all... gone
 Finished digging out the grass sod from under the main oval of track. Weed mat down.
 Next weld, and level the track, install granitic base, sleepers...
The levels for the "Y" and the side track by the house are dependant on the main track, so they will be last.
Friday, 20 November 2015
Heatwave
Yesterday made 39 celsius, today looks like its done at 34, but it has been over 30 since 1030! Inside jobs tilit cools.
Have decided to use granitic sand roadbase for the railway base. It should set well.
I will get a trailer load and leftovers will fill a few holes in the drive...
Have decided to use granitic sand roadbase for the railway base. It should set well.
I will get a trailer load and leftovers will fill a few holes in the drive...
Wednesday, 18 November 2015
Railway Navie...
 Trying to stay in the shade this morning, but the sun caught up to me 10 am it's 30!
 Even after rotary hoeing a couple of times it is still hard to chip out the grass roots. None-the-less I have made significant progress...
Weed-mat might help keep grass out of the roadbed, I hope.
Tuesday, 17 November 2015
Rotary Hoe...
 I'd sure hate to cut up the cooch grass by hand. Especially this next few days - 32 at the moment, then 34 tomorrow, 39 Thursday.
 Moneys worth out of the CHonda motor in an hour or so. All the spoil will go to filling in the dip down to the lake. The slope on the right is quite concave...
Now to clean it out by hand - then cart the roadbed in barrow at a time... after I find the right material, at the right price!
Took levels with Maz this morning. The ground level varies about 120mm, so will get the road bed level as I can, then top dress the grass up to level... eventually. But we really just need the main oval finished by Christmas. And FYI, it is a mere 33m around!
Monday, 16 November 2015
The Station, 'Platform 9 3/4' tidied up.

Sprinklers re-planted; the green caps cover valves to control the flow to this pair of edge sprinklers.
At the far end in the pix the rail top is just below old ground level, the near end it is about 3cm above...
So next job is to shoot some levels with the Lufkin 'dumpy' level. Then move the rest of the track rotary hoe and dig out the rest of the track base...
Then a trailer load of granitic sand.
Oh! and I still have sleepers to finish...


Saturday, 14 November 2015
Start of the Railcar

Here is the start of a freestyle rail motor... A ride-on and tow vehicle. Driven axle (450watt) from Warrick Sandberg. Front bogie die cast wheels from Ian Ramsay (DNC). Pillow block bearings... China ($4 ea). Custom Axles, Peter...
Might look something like one of these...


Friday, 13 November 2015
Flush concrete Finished!!! ... well all but...
Well, here is the other end of 'Platform 9 3/4'... except for being one bag short! I think I will emboss something in the last little triangle...
Tried a new idea with this and cut 20mm wide strips of a 6-7mm old foam hiking mattress and put the strips in the gap... saved a lot of time cleaning out the rail-checkrail gap. Worth it!

Tuesday, 10 November 2015
SW end (of the 'station' is) DONE!
Well it took 4 bags, not 2+. I made the end a little deeper as the track is about 40mm higher than the old concrete - which is the starting slope of the boat ramp fillet. I have kept the track level to the end of the new concrete. Now for the north eastern end...

Monday, 9 November 2015
Even more concrete...

Getting tricky as the adjoining extant concrete starts to slope to the boat ramp.
Only about 2 bags to go... on this end anyway! The lawn watering will be re-buried along the edge of the new concrete. The sprinkler about 15cm to the left of where it sits in the pic.
The other sprinkler will be similarly placed inside the concrete curve at the other end.
Sunday, 8 November 2015

Saturday, 7 November 2015
More flush concrete!
 It's been wet for a few days so have been working inside, preparing the main bedroom for paint.
Today is a beaut so have got back to concreting. Using more than I anticipated... $$.
However the result is good, but I might make it a bit thinner outside the curves. The track is not perfect, a little twisted and bowed, so I am making it straighter as I go along. Levers and shims...
The 3.1m I have done in the photo is 6x20kg bags of concrete + 15 litres water!!!
Not going anywhere!
Wednesday, 4 November 2015
Flush Concrete ... well a metre ...
 First concrete down this morning. The two bags left over from seawall repairs, 40kg, makes 1050mm!!!! No 'reo' with all that steel in there and have used bar chairs left over from years ago to support the track for the concreting. I have 'broomed' the surface since the point of burying the track is to prevent tripping, so lets have no slipping either!!
Collected 10 more bags of premix concrete this afternoon... intend to lay more tomorrow - when my knees have recovered and the afternoon showers are long gone...
Tuesday, 3 November 2015
20-25% of the Roadbed dug up...
 Busy Cup Day today. I have cranked up the Rotary Hoe. But first I needed to locate and remove - or bury - the lawn sprinkler pipes... by hand.
Then having dragged the 10m or so of guard railed track out of the way, it's hoeing time... I figure on using the spoils to fill in the sinkhole areas near the lake, but there is a shed load of dirt... I will run out of places to spread it. Can't be too thick or I'll just kill the grass...
 Made it about 3/4 of the way before 3PM (having walked Honey earlier and then a quick trip to the Ski Club TAB to put a wager on the Cup). Maz picked third place, so might get her $6 back...
 By 4:30 I am done, but I do have the house side piece of track, about 10m, dug in and nearly ready to be concreted in. It will be flush with the top of the concrete under the balcony - no tripping allowed. I just need to reinforce a couple of joins and get the track smooth along the track, no dips - and level across the tracks, then box it and get more instant concrete.
This section has a fixed height - the existing floor so the rest of the circuit will be as close to that level as I can manage. The rest will be dug out and a granitic sand base put under the track. So much spill to get rid of!!!
Sunday, 1 November 2015
Digging Roadbed!!!
 Our ancient Ariens Rotary Hoe motor has been on its last legs for a while. Have finally given up on it and bought a 6.5 HP Chinese Honda copy - a CHonda. With electric start - extra $5, why not - delivered for $170!!!
Couldn't even get the drive pulley off the old motor - cast iron on a steel shaft, so cost me $12 for a new one. The original motor has a built in reverse pulley, the CHonda doesn't so no reverse. If it gets bogged, have to pull it out. But it works a treat.
I swapped the outside tynes and turned inside out to reduce the digging width to about 55cm. So off we go to dig up the roadbed...
Thursday, 15 October 2015
Signal Box progress

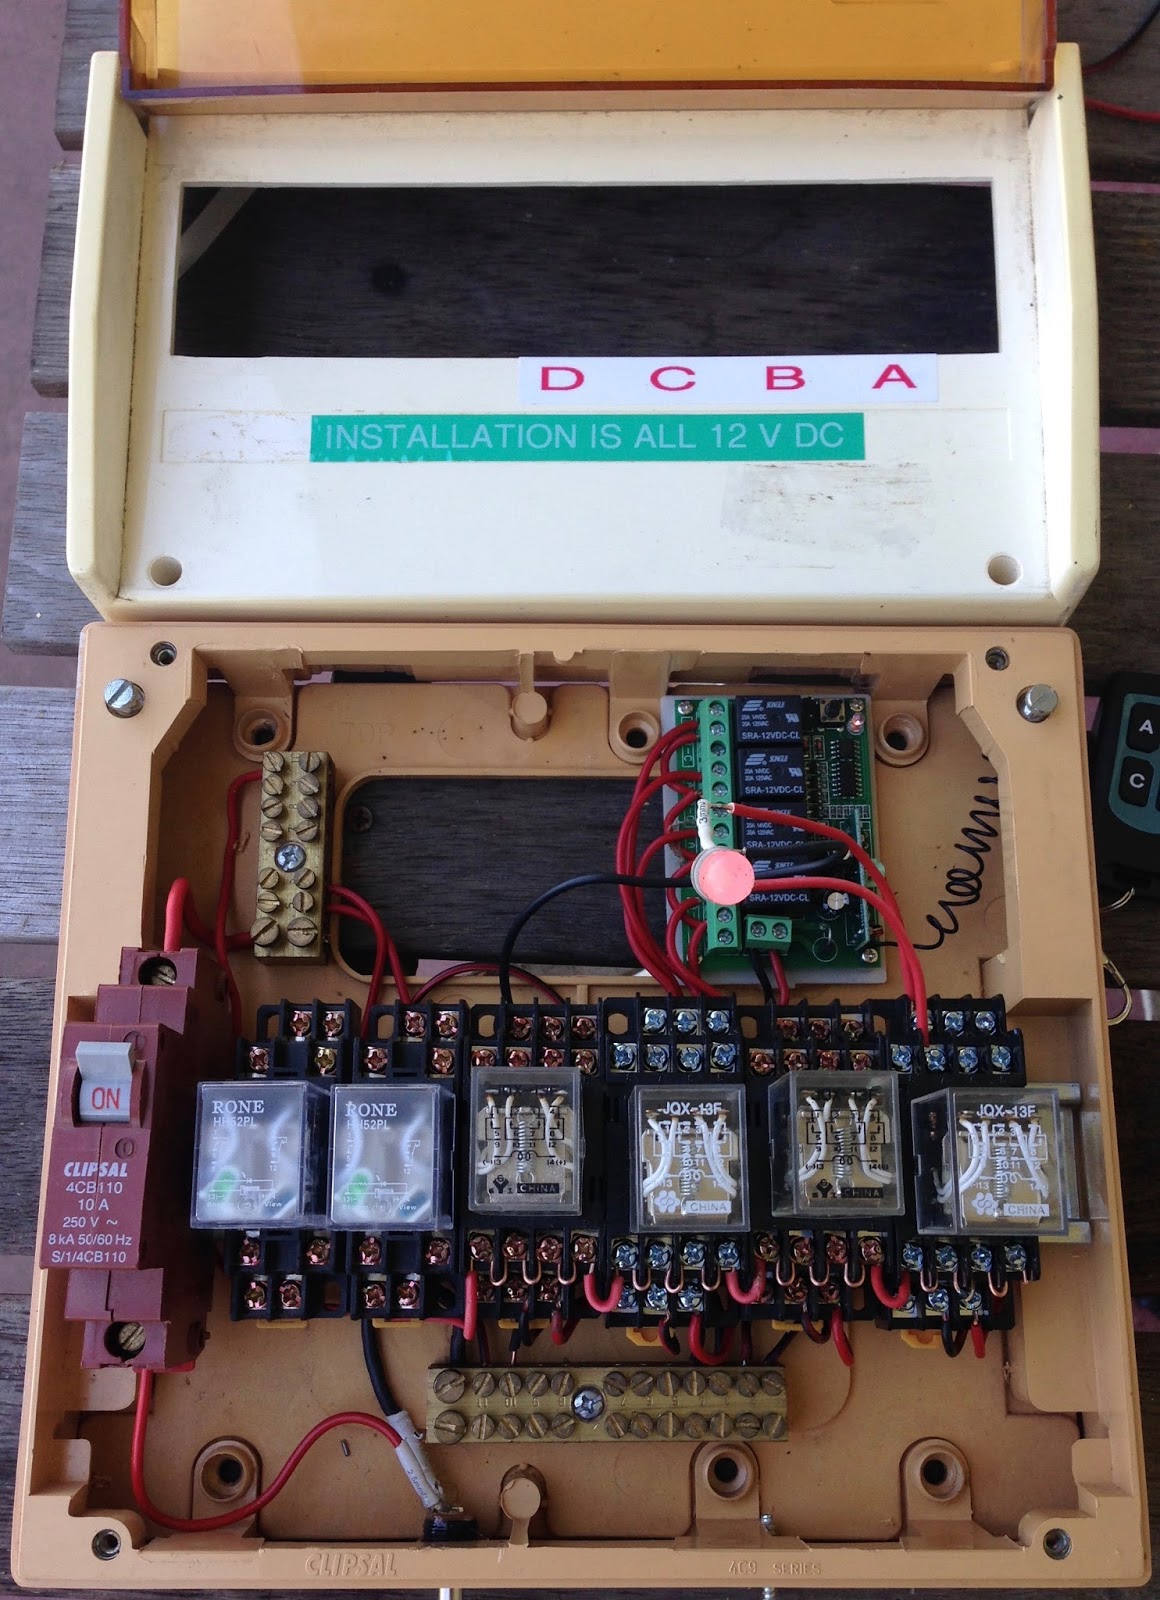 I have been working on my switch box. Four channel remote driving 4PDT (4 pole double throw relays). The remote toggles on off on each channel... one press = on, next press=off.
One switch on the relay will activate the air solenoid. The other are available for signals.
This little video shows (not very well) the 10mm LED changing from red to green.
It is all 12VDC with dropping restores on the LEDs
Saturday, 3 October 2015
Pressure!!!
 Pressure tested the accumulators to 100psi (700kpa). Put them in the lake behind the seawall and pressurised... Nothing blew. So I have a 100% margin for 50psi (350kpa) in operation. All the other components are rated to 1Mpa (145psi)!
Thursday, 1 October 2015
Not much happening... for a moment...
 Been gardening etc; it's Spring! Gardening mainly around the railway, must admit... Meanwhile have been digging along side the house to bed the track. The ground is like concrete, well weak concrete.
I have decided my unsprung bogies are not up to use on the riding car, partly because of the very small wheels @ about 65mm diameter; so they have been removed... Warwick Sandberg, sprung bogies with bigger wheels seem the go...
I reckon the original bogies might be used on a self powered, remote controlled refrigerator car (Esky)!

And whilst awaiting, the cheap Chinese pneumatics I have made a couple of air pressure vessels from extant UPVC pipe and cap fittings. The 1/2 BSP socket will accept a T piece - 1/2 to twin 6mm PU tubing. The accumulators will be buried near the points solenoids to ensure quick response - and reserves.
Been researching signalling. All to be light signals. Fortunately in Moira Mini Rail we have a signals expert, Trever, who looks after all the signalling for NE Vic rail network!!!
Wednesday, 30 September 2015
Remote control for points - change of mind...
After talking to Laurie about powered point changing, I conceded to myself that pneumatics have serious advantages. Not least that I have several compressors, storage vessels and regulators.
So each point will be powered by a small double acting ram operating at about 350 kpa (50psi) with about 16mm bore, 15mm stroke. The point movement is 10mm, so pressure will be held on the blades.
A 12VDC 3 way servo solenoid will switch each one. A small accumulator will be buried new each setup. The 12V will be wirelessly controlled and signals switched by the same relays...
So I have purchased several cylinders, solenoids, push on 6mm tube fittings and some tube. (Cheap Chinese, cost about $25 each setup). The relays and remote have arrived. And have made a couple of accumulators from 50mm PVC pressure piping.
Saturday, 26 September 2015
Retiring the track Jig... now available for loan...

 I have cleaned up the track jig, and hung it up, literally. It has done its job.
Points, turnout #4 is nearly finished.
Feel like redoing the first two now it is neater and been easier...
Thursday, 24 September 2015
99% of track!!
 I reckon 99% now - not counting sleepers... ( the panorama photo function not so good with blending the track... I will try again!)
 This is how I have jigged the joins for welding. Bar clamped on and re-inforcing fishplate or baseplate to be
 clamped in place. Easy to check that the track is level and the curve smooth at the join. Along side are the adjustment devices...
Tuesday, 22 September 2015
98%...

 This afternoon I tackled the Y. Bit the bullet and cut off the straight end at the first tie past the nose of the points and attached enough pre-curved bar to complete the whole bend. One end of that bend is welded to points number 2 and now jigged for welding to points #3 (the Y) - tomorrow...
Its more important that the main track curves are smooth bends. The Y not so much...

Also only assembled enough of points #4 to lay it out properly, so I better get on with the frog and installing the blades, which are ready to go..
So I have a 1.2m length of straight to finish, a few other bits of track to finish and several ties to weld in...
Monday, 21 September 2015
97% of a track...
Welding, cutting, bending, straightening, cutting and drilling more ties... nearly there!!!
Still need to modify the 'Y' point - the straight bit needs to be curved a bit from the point nose - like a "Y", der... I just can't get the curves to blend properly.
Aside from that, just a few short bits to cut and shut!!
Next video will be from the carriage!!
Saturday, 19 September 2015
More (the rest of the) curves...

 Had a bender of an afternoon with Laurie at Wunghnu on Thursday... Thank you Laurie!
Rolled the rest of the curved bar that we need ... AND an 'S' bend! I need a right and left bend to displace about 350mm to go down the side of the house and around the water tank!
One more 1/8 curve to go... and a few bits.
Wednesday, 16 September 2015
Sleepers

Whilst waiting to curve the last bars for the backyard, go on with cutting more sleepers. The old Jarrah balcony floor was cut into pieces about 350-400mm long and I am trimming to 300. The hard part is trimming the tongue and grooves from the sides...
Also a better shot of the rail jig with a 3m straight with ties in place awaiting welding.

Saturday, 5 September 2015
The Layout !!
Now that I have some real track and real dimensions, it's time to work out exactly how much more track I need to make, and what... So today I have laid out what I have made, moved it around, straightened joins and marked it out properly. I am staying away from the slopes down to the lake and the boat ramp. The red line is what the track layout will be! So I am about 60% of track made...


Thursday, 3 September 2015
An operating point - turnout - switch!!!


First LH set of point together today. The inner rails and blade just tacked for the moment.
My standard bogie/truck runs through cleanly. But it really needs the check rail on the curve... It works! The motion is a bit draggy, but I’ll work on that.
 I eventually decided to grind a relief nudge in the outer rails to seat the blades - which were machined from the 10mm width to nothing over 280mm. I have cut the fine end off at 1.5mm width.
So one (nearly) down. One half done, Two to go. I have all the blades...
Subscribe to:
Comments (Atom)