Thursday, 15 October 2015

Signal Box progress


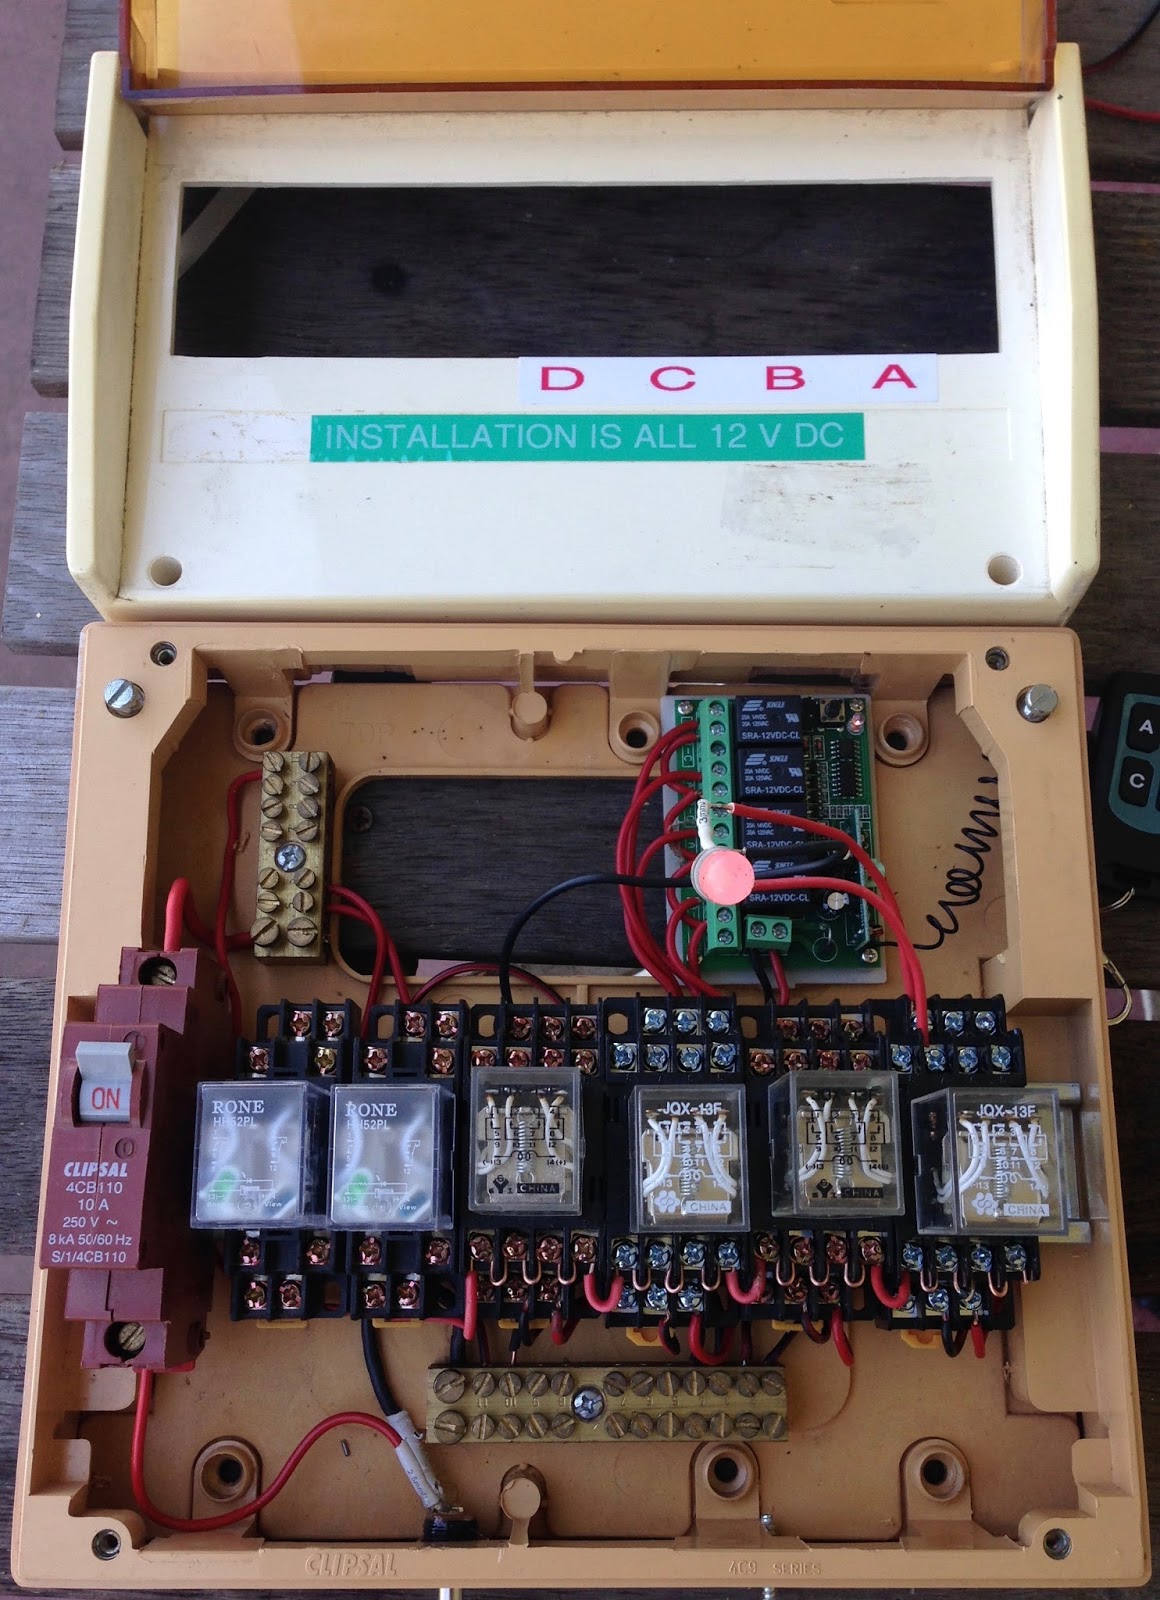
I have been working on my switch box. Four channel remote driving 4PDT (4 pole double throw relays). The remote toggles on off on each channel... one press = on, next press=off.

One switch on the relay will activate the air solenoid. The other are available for signals.
This little video shows (not very well) the 10mm LED changing from red to green.
It is all 12VDC with dropping restores on the LEDs

Saturday, 3 October 2015

Pressure!!!

Pressure tested the accumulators to 100psi (700kpa). Put them in the lake behind the seawall and pressurised... Nothing blew. So I have a 100% margin for 50psi (350kpa) in operation. All the other components are rated to 1Mpa (145psi)!

Thursday, 1 October 2015

Not much happening... for a moment...

Been gardening etc; it's Spring! Gardening mainly around the railway, must admit... Meanwhile have been digging along side the house to bed the track. The ground is like concrete, well weak concrete.

I have decided my unsprung bogies are not up to use on the riding car, partly because of the very small wheels @ about 65mm diameter; so they have been removed... Warwick Sandberg, sprung bogies with bigger wheels seem the go...

I reckon the original bogies might be used on a self powered, remote controlled refrigerator car (Esky)!

And whilst awaiting, the cheap Chinese pneumatics I have made a couple of air pressure vessels from extant UPVC pipe and cap fittings. The 1/2 BSP socket will accept a T piece - 1/2 to twin 6mm PU tubing. The accumulators will be buried near the points solenoids to ensure quick response - and reserves.

Been researching signalling. All to be light signals. Fortunately in Moira Mini Rail we have a signals expert, Trever, who looks after all the signalling for NE Vic rail network!!!


Wednesday, 30 September 2015

Remote control for points - change of mind...

After talking to Laurie about powered point changing, I conceded to myself that pneumatics have serious advantages. Not least that I have several compressors, storage vessels and regulators.

So each point will be powered by a small double acting ram operating at about 350 kpa (50psi) with about 16mm bore, 15mm stroke. The point movement is 10mm, so pressure will be held on the blades.

A 12VDC 3 way servo solenoid will switch each one. A small accumulator will be buried new each setup. The 12V will be wirelessly controlled and signals switched by the same relays...

So I have purchased several cylinders, solenoids, push on 6mm tube fittings and some tube. (Cheap Chinese, cost about $25 each setup). The relays and remote have arrived. And have made a couple of accumulators from 50mm PVC pressure piping.

Saturday, 26 September 2015

Retiring the track Jig... now available for loan...

I have cleaned up the track jig, and hung it up, literally. It has done its job.

Points, turnout #4 is nearly finished.

Feel like redoing the first two now it is neater and been easier...

Thursday, 24 September 2015

99% of track!!

I reckon 99% now - not counting sleepers... ( the panorama photo function not so good with blending the track... I will try again!)

This is how I have jigged the joins for welding. Bar clamped on and re-inforcing fishplate or baseplate to be
clamped in place. Easy to check that the track is level and the curve smooth at the join. Along side are the adjustment devices...

Tuesday, 22 September 2015

98%...

This afternoon I tackled the Y. Bit the bullet and cut off the straight end at the first tie past the nose of the points and attached enough pre-curved bar to complete the whole bend. One end of that bend is welded to points number 2 and now jigged for welding to points #3 (the Y) - tomorrow...

Its more important that the main track curves are smooth bends. The Y not so much...

Also only assembled enough of points #4 to lay it out properly, so I better get on with the frog and installing the blades, which are ready to go..

So I have a 1.2m length of straight to finish, a few other bits of track to finish and several ties to weld in...

Monday, 21 September 2015

97% of a track...

Welding, cutting, bending, straightening, cutting and drilling more ties... nearly there!!! 

Still need to modify the 'Y' point - the straight bit needs to be curved a bit from the point nose - like a "Y", der... I just can't get the curves to blend properly.

Aside from that, just a few short bits to cut and shut!!

Next video will be from the carriage!!


Saturday, 19 September 2015

More (the rest of the) curves...

Had a bender of an afternoon with Laurie at Wunghnu on Thursday... Thank you Laurie!

Rolled the rest of the curved bar that we need ... AND an 'S' bend! I need a right and left bend to displace about 350mm to go down the side of the house and around the water tank!

One more 1/8 curve to go... and a few bits.

Wednesday, 16 September 2015

Sleepers


Whilst waiting to curve the last bars for the backyard, go on with cutting more sleepers. The old Jarrah balcony floor was cut into pieces about 350-400mm long and I am trimming to 300. The hard part is trimming the tongue and grooves from the sides...


Also a better shot of the rail jig with a 3m straight with ties in place awaiting welding.

Saturday, 5 September 2015

The Layout !!

Now that I have some real track and real dimensions, it's time to work out exactly how much more track I need to make, and what... So today I have laid out what I have made, moved it around, straightened joins and marked it out properly. I am staying away from the slopes down to the lake and the boat ramp. The red line is what the track layout will be! So I am about 60% of track made...

Thursday, 3 September 2015

An operating point - turnout - switch!!!


 First LH set of point together today. The inner rails and blade just tacked for the moment.

My standard bogie/truck runs through cleanly. But it really needs the check rail on the curve... It works! The motion is a bit draggy, but I’ll work on that.

I eventually decided to grind a relief nudge in the outer rails to seat the blades - which were machined from the 10mm width to nothing over 280mm. I have cut the fine end off at 1.5mm width.

So one (nearly) down. One half done, Two to go. I have all the blades...


Tuesday, 1 September 2015

Joins in the 'Curve Jig'

 Made a second curve and used the jig to weld the two, 3 metre lengths together. So now have about a quarter circle in one piece. The join is smooth and even!!

Next time though I will put the jig on the ground, or at least out on the grass. Hard work getting the big piece out of the jig and around the veranda posts...

The weld still needs a little work now its out of the jig. Really could do with a gas MIG welder...

Oh and I have 8 600mm lengths of 'rail' with Pete at McBurnie's to be machined for 275mm into blades for the points...

Friday, 28 August 2015

First 'point in the jig!


Another bit of play time today. The first sets of points / switches / turnouts are in the jig. I am first working on the 'right hand turnout'. 

Here it is carefully 'gauged' with a few ties weld on at the ends. My first 'point' is a bit rough - underneath, (which is what you see in the jig) but welders and grinders will fix that. 

When done I plan to harden the point with heat and quenching... 

Next I need some bar machined into blades...

Thursday, 27 August 2015

First Curved Rail from the new JIG!

Well, having made a jig for curves, I had to try it out! So another 'play' day for me.

Here is the first 4m outside radius curve.
Upside down in the jig and right way up...

It takes 8 for a circle!

And Laurie, I did bash the ends into some sort of curve...(The rollers miss about 100mm on the ends).

As I have made the curve jig with scope for only 0.5-1mm gauge widening, more than two axle wheel sets will struggle with the tightest radius. So I limit myself to dual axle bogies and loco to 4-4-4 wheel sets - and assuming side movement on the bogies too...

Wednesday, 26 August 2015

Curves and more jig...

With Laurie and Trever from our club, Moira Miniature Rail, last Sunday

afternoon we curved a pile of 20 x 10mm mild steel bar as rail for the SR(G)R, along with some 20 x 20mm RHS for the curve and points jig.

Interesting learning experience as the resilience of the bar varied quite a bit. Each couple of metres took the bending differently. I expected that once we set the roller correctly it would just be a matter of feeding in the lengths... Wrong. Each piece needed adjustment or re-rolling, or un-rolling. An hour or so's work took four...

The RHS was another matter. We did the short outer curve first - went well. The inner curve was the fed. Being a shorter radius, it should have required a second pass. Disaster it curved way too much. We worked out that the welded seam was on the inside, whereas with the first piece it was on the side.

As the tube is rolled then welded it is apparent that the rolling work hardens the steel and welding the seam anneals that side. So the welded side is 'softer' and bends more easily. didn't think that through first... So an hour was spent trying to reduce the curve. Live and learn.

This morning I have tacked up the curved bit of the combo straight-curve-points jig. This is upside down in the first two pix... Right side up in the third... to assemble the track and outside rails of the points upside down - in order to weld the sleeper ties on from under the rail. Neater?

Most of the ties under points will be continuous across all rails. Just placed some pre-cut and drilled straight ties here to play with spacing. Then I will fire up the band saw...

Tuesday, 25 August 2015

Points motors...

Decided to electrically switch points using a 50mm throw linear actuator through a sprung bellcrank!

Have ordered some bits: a four channel RF remote, some 12vDC DPDT relays and one actuator to try.
I have a small DIN distribution board to house the relays and rx...


Saturday, 28 February 2015

Track Jig

 First 3 metre length of straight track in the jig was made yesterday!!

Welded under the rails - with new rods!!! My old ones got wet ... again. Also used newly cut gauge gauges at 127.1mm, and every metal clamp I own.

All the sleeper/tie spacing (150mm) was carefully measured so I will flip the track back into the jig and weld on some locating guide plates for easy positioning of ties on the next length.

The jig will soon be a 4 way device: straight, 4m curve, left point, right point!!


Tuesday, 17 February 2015

Change of Project... Y Class

While nothing much is happening with the SRR, I have still been researching and thinking... Yes dangerous, I know. As a consequence I have changed aim and plans a little. As discussed the old VR Tait trains stick so much in my memory; I really want to build one... but as a 'Fast Parcels'. But first I need to build a 'diesel' (well really battery) electric.


While the F Class is a favourite, closely followed by T Class, I have just discovered/realised that the Y Class used recycled power bogies from the swing door Tait power units. So, if I design and build scale bogies I can use them on both!! The shorter distance between bogie pivots (compared with Y Class) will help me on (my) tight curves. So 4 m radius is a design spec.

Also considering scale: the majority of 5" gauge scale rolling stock is 1" to 1' ; 1/12 ; 1:12 so that will be the scale! Which also helps with the tight curve; compared to 1/10th...

Now a 4m radius is a circle of circumference of 25.1m. In 1/12 scale the bogie pivots centre is 0.516m or 0.02055 of the circle. So 360x.02055 means the bogie only need pivot less than 8 degrees between themor 4 each - tangential to the curve. With axle centres of 0.216m - on the curve the axles will be displaced a maximum of about 15mm each way. And so the design specs solidify...

Thursday, 15 January 2015

Scale!

Did I mention how annoying (and pointless) I find the "something to the foot" scales?
I can't figure how anyone thought 16mm to 1 foot was sensible.

Well if a 5" model gauge track represents a real 'broad gauge' track of 5'3" (Victorian/Irish) or 4'8.5" (Standard/ Two Roman mules whithers wide); that either 63"/5" = 12.6:1 or 56.5"/5" = 11.3:1 would be the appropriate scales...

The average of both options is 11.95:1 OR damn near 12:1 OR ONE INCH TO THE FOOT!
If I pursue Vic Rail prototypes, then I have just about talked myself into it!!!

On the other hand, my new  friend Duncan is pursuing narrow gauge prototype so 3'6" gauge equates to 42"/5"= 8.4:1 whereas 3' gauge equates to 36"/5" = 7.2:1. He is settling on 8:1 = 1/8th scale.

My starting point of 10:1 = 1/10th scale is very close to  1 205/1024 inches to 1 foot !!!! (1:9.999!!!) Maybe the world needs a new standard!!!